Monday, January 27, 2014
On Workbenches Part II The Clockwork Bench
So how do I plant to incorporate the lessons Ive learned from the Schwarz into my own Clockwork Workbench? They form the foundation of my approach. My bench will be a 3D clamping surface with legs flush with the edge. That is where I leave the purity of Roubo.
In terms of overall shape & form, Im basing my Clockwork Bench off of Robert Langs 21st Century Workbench. From his design Im changing the leg assembly the most, using trapped panels in addition to stretchers. This is designed to simplify the joinery, reduce the ability of the bench to rack and add mass.
Though the trail I’m following has been blazed by Megan Fitzpatricks LVL bench, materials are where my bench will be least conventional. At least half of the top will be of LVL construction. The second half of the top may be LVL too, or it may be Timberstrand (dimensional lumber made of OSB). My legs and stretchers will be Timberstrand, with each front-to-back leg pair housing a double panel composed of one layer each 3/4" OSB & 3/4"plywood MDF.
It sounds like quite the bastard, I know. Yet Im looking forward to building and using it. I am optimistic (perhaps naively so) that it will be my penultimate workbench.
Does your workbench rest on a foundation of bench philosophy or did you just find a flat surface and get to work?
 |
| Bob Langs 21st Century Workbench |
 |
| Megans "Gluebo" LVL Bench. |
 |
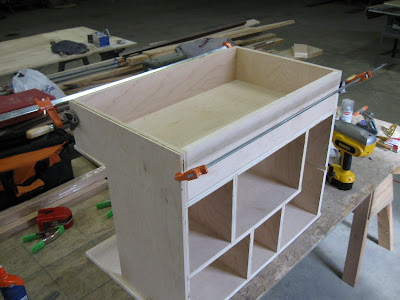
| One of my stretcher panel assemblies, just prior to glue up. |
Does your workbench rest on a foundation of bench philosophy or did you just find a flat surface and get to work?

Chain Saw Fine Furniture
3/2/10 Were moving relatively slowly on this project to allow the 2.25" thick slab to acclimate to our heated shop ... It had been stored in a concrete floored, unheated barn until it arrived here last week .. We took a little off both sides last week and we flip it pretty much every day. It has stayed remarkably flat and now were working to assemble the base ....click the pictures to enlarge them .
 The figured are at the crotch end of the slab
 looking down from the crotch end
 from the stump end
Last week, ready to cut ....

I started my woodworking career in 1974 as a logger for a local timber contractor ... I lasted about 6 months ... After that, I spent the next 23 years cutting and splitting firewood to heat my house and shop in Arlington .... I got back into the wood heat thing last year and Ive become pretty good friends with my chain saw again. When we had to cut this slab to size, I thought that my Stihl might be the best tool for the job as the log had already been chain sawn to rough shape before it was milled into slabs .. Ta Dah ... The edges actually will look like before we cut it .... Dont try this at home ....
 Click the photos to enlarge them .... Previous post on this table ...
 It was a bit of a reach
 This was actually really fun .....
 Cutting to 10
 All done ... ready to smooth ....
Read More..
The figured are at the crotch end of the slablooking down from the crotch endfrom the stump endLast week, ready to cut ....
I started my woodworking career in 1974 as a logger for a local timber contractor ... I lasted about 6 months ... After that, I spent the next 23 years cutting and splitting firewood to heat my house and shop in Arlington .... I got back into the wood heat thing last year and Ive become pretty good friends with my chain saw again. When we had to cut this slab to size, I thought that my Stihl might be the best tool for the job as the log had already been chain sawn to rough shape before it was milled into slabs .. Ta Dah ... The edges actually will look like before we cut it .... Dont try this at home ....
Click the photos to enlarge them .... Previous post on this table ... It was a bit of a reach This was actually really fun ..... Cutting to 10 All done ... ready to smooth ....Rileys Dollhouse Day 3
Day 3 - pillars and stairways
In the photos below, you can see that Ive enclosed the top storage area. This will get a nice top thats hinged and will be a great place to put all the crucial accessories!
Ive also created and formed the pillars. Ive routed a 1/2" roundover on all 4 sides of each one - this will make them more friendly to little hands. In the photo below, Ive temporarily set them in place to see what they look like.
Finally, Ive gotten a start on the stairway. I need to make an actual stairway, so that it will look authentic. Next to scroll saw work, this is one of the more time consuming processes on a house like this. Ill finish the stairway tomorrow. It will need to be completely finished before I put the face on because I need to access the underside of it from the front...


Read More..
In the photos below, you can see that Ive enclosed the top storage area. This will get a nice top thats hinged and will be a great place to put all the crucial accessories!
Ive also created and formed the pillars. Ive routed a 1/2" roundover on all 4 sides of each one - this will make them more friendly to little hands. In the photo below, Ive temporarily set them in place to see what they look like.
Finally, Ive gotten a start on the stairway. I need to make an actual stairway, so that it will look authentic. Next to scroll saw work, this is one of the more time consuming processes on a house like this. Ill finish the stairway tomorrow. It will need to be completely finished before I put the face on because I need to access the underside of it from the front...
Sunday, January 26, 2014
Online Home Decor Resources
Im working on finishing up my project for the first round of Creating with the Stars Only a few more days! I really like how it is coming along, hopefully youll love it too! Voting opens this Monday (Ill share more details a little later)!
--
I live about 3 hours from a big city, were not in the middle of no where, but home decor items are definitely lacking. Luckily, online shopping has brought everything right to my doorstep!
Here are a few of my favorite places to shop online:

Crate and Barrel - I love a lot of their textile lines, especially Marimekko prints, they are fun and bold! Although I havent bought any furniture there, Ill definitely be looking at few sofas here when we are ready for a new one (maybe this, this, this or this). They also have a few upholstery sale events, so that could be a good time to buy!
West Elm

Great textiles and furniture! I love browsing the sale section :) They also have upholstery grade fabric, so if you are looking for something more durable, browse the selection here (it also comes packaged really well!)
Urban Outfitters
Great accessories and I love the rug selection too, especially this one and this one
Finally, Fabric.com

My first stop for fabric is here because they consistently have a great selection and prices!
This is just a brief list, but definitely some of my favorites! Do you have any favorites that arent on my list? I love finding new resources!
and looking for more online resources? Danielle Oakey has a great list here!
Read More..
--
I live about 3 hours from a big city, were not in the middle of no where, but home decor items are definitely lacking. Luckily, online shopping has brought everything right to my doorstep!
Here are a few of my favorite places to shop online:
Crate and Barrel - I love a lot of their textile lines, especially Marimekko prints, they are fun and bold! Although I havent bought any furniture there, Ill definitely be looking at few sofas here when we are ready for a new one (maybe this, this, this or this). They also have a few upholstery sale events, so that could be a good time to buy!
West Elm
Great textiles and furniture! I love browsing the sale section :) They also have upholstery grade fabric, so if you are looking for something more durable, browse the selection here (it also comes packaged really well!)
Urban Outfitters
Great accessories and I love the rug selection too, especially this one and this one
 |
| honey comb glass pendant |
 |
| magical thinking crewel ikat pillow |
My first stop for fabric is here because they consistently have a great selection and prices!
This is just a brief list, but definitely some of my favorites! Do you have any favorites that arent on my list? I love finding new resources!
and looking for more online resources? Danielle Oakey has a great list here!
Two Oval Tables

We finished up two oval dining tables this week. The first, in English elm from Berkshire Products, has been in the shop for a while, after a finish change from natural to a light stain ... It looked great when it left and the client was very happy when it arrived. Click the photos to enlarge them ....

The legs are the same as on the big claro walnut table we made earlier this year, and we will be doing a variation on this base on anther big claro table that we will start this week ... More on that later as we progress ...
Shows the underside .... The metal structure, once the bolts are tightened and it is attached to the top, is surprisingly rigid ... no, make that completely rigid ...
 The table below I wrote about in the post new table design, earlier this month. In person, its 60" wide x 86" long presence is very powerful. The top is only four boards from the same walnut log (only without the hardware) that we made the Bethlehem Steel dining table from earlier this year ... Its beautiful lumber ...
 The long crosspieces and bolted engineering also made this base extremely rigid
 Close up ...
 Glue up ... more photos in the earlier post ... the base design and glue up was a very interesting process of discovery ...
 While we we working on the dining table, the client added the Bethlehem Steel style console above which she will use to display a Dale Chihuly piece she owns ... Its shown above unfinished, but will be reassembled probably Tuesday ...
This past week
Ive been away for the past few days, enjoying catching up with family and friends as well as relaxing! Ill be back to a more normal blogging schedule soon.

I didnt take many photos on the plane since I wasnt by the window (and my neighbor didnt appreciate me leaning over him), but I did snap this one going over the southwest. We left the sunshiny west and was welcomed to DC by wind and rain, but we were just happy to see our family!

The next morning I had a snuggle with my favorite kitty (dont judge my Christmas pjs :) Cant believe that its been a year since Ive seen her.


and a little more on the day after Christmas.

I did a little shopping.

Love Targets new spring lamp collection!

and finally tonight, we had an amazing dinner at Range, Bryan Voltaggios new restaurant in Chevy Chase. We sat at the chefs table so it was fun to see the chefs at work!
Its been a fun and relaxing week in MD! Ill be back to a more regular blogging schedule after New Years. Cant wait to finish some of the projects Ive been working on!!
Wishing you and your family a happy and healthy new year!
Read More..
Heres a little of what Ive been up to. We drove down the coast to fly out of LAX. Surprisingly, it wasnt too busy, but in any event the drive was pretty!
I didnt take many photos on the plane since I wasnt by the window (and my neighbor didnt appreciate me leaning over him), but I did snap this one going over the southwest. We left the sunshiny west and was welcomed to DC by wind and rain, but we were just happy to see our family!
The next morning I had a snuggle with my favorite kitty (dont judge my Christmas pjs :) Cant believe that its been a year since Ive seen her.
Christmas Eve we had a little snow ...
I did a little shopping.
Love Targets new spring lamp collection!
and finally tonight, we had an amazing dinner at Range, Bryan Voltaggios new restaurant in Chevy Chase. We sat at the chefs table so it was fun to see the chefs at work!
Its been a fun and relaxing week in MD! Ill be back to a more regular blogging schedule after New Years. Cant wait to finish some of the projects Ive been working on!!
Wishing you and your family a happy and healthy new year!
Dylans Frame
On Saturday, my son is displaying in an art show at the Central Park Zoo. One of his pieces is a large painting on canvas. In order to display the painting I was assigned building him a frame.
 |
| Can you see the frame yet? |
I’ve enjoyed using the rough sawn lumber I picked up from +Kari Hultman last summer on my last few projects, so I began the frame build by heading to the attic and selecting a large slab. I’m not sure what type of wood it is. Once milled, it’s a nice blond color with a mild grain pattern.
To make the frame, I broke the slab into three (3) pieces with my jigsaw and then joined and planed them flat. Though I only planed them until all three (3) were flat and parallel, they ended up being exactly 1” thick when I was done. Once I had ripped them to width, I used my Incra Miter 1000 SE to cut the miters. I call it out so specifically not to brag about it, but to complain. I find the flip stop annoying to use and the face of the fence is not plum, resulting in the leading edge of the work lifting when it is held or pushed against the fence. I had problems with my miters, and I believe this is why. Finally, I cut the rabbet for the picture with two (2) passed on the table saw.
 |
| The dreaded 1000 SE (the burning is because the blade desperately needs to be cleaned). |
After everything was cut, I set a domino in each miter and glued up the frame. This was the first time I’d used the framing blocks for my parallel clamps. I was pleasantly surprised by how well they worked.
 |
| My sloppy miters. |
To address the gaps in the miters, I used wood putty mixed with rasp shavings. I decided that rasps would be the quickest way to make the pile of dust I needed. Unfortunately, I decided that a coarse rasp would make the dust quicker, so I used the coarse side of my Shinto rasp. The Shinto rasps leave shavings closer to what you’d get off a jointer than to saw dust. These big shavings didn’t mix very well and some didn’t even fit in the gaps at the miters. Even after puttying the miters aren’t perfect. I’ll probably use a wax stick to fill in the remaining small gaps once I’m done with the finish.
I followed +Marc Spagnuolo’s Simple Varnish Finish instructions and finished the frame with 5 coats of General Finishes Arm-R-Seal. The final coat still needs to be buffed out, but it looks good.
 |
| The frame - mid finishing - during a dry run of fitting the picture. |
Subscribe to:
Posts (Atom)